13 Jun 2017
We have liftoff!

Cue me trying to not get my fingers cut off
The quadcopter has been built! I had some problems during the building process, so this is a guide which will hopefully make things easier for people to start off with making their own quadcopters.
I suggest going through all these websites thoroughly before purchasing a single part for your quadcopter. It's not an extensive list, so I'll keep updating it as I find more useful links:
If you live in India, the following sites are good places for shopping for parts:
RCBazaar and RCDhamaka have stores in Bangalore. Robu.in is based in Pune.
Hardware Assembly
For clarity, the components I have used in my build are:
- 1045 Propellers x4
- REES52 DJI F450 Frame
- REES52 CC3D F1 Flight Computer
- REES52 1000KV A2212 30A Brushless Motor x4
- REES52 SimonK 30A Electronic Speed Controllers x4
- APM 4-axis Power Distribution Board Type-B1
- SunRobotics 2200mAh 3S 35C LiPo Battery
- FlySky FSCT6B Computer Transmitter
Most of these parts can be picked straight off Amazon. REES52 has a good bundle for a pair of propellers, 1000 KV motor, and ESC which I would recommend buying to keep costs low.
Frame
The first thing you would want to do is start off with the frame of the quadcopter. If you go for a DJI F450 frame (or one of its hundred clones), you will get a box with four arms (technically called booms) for mounting the motors and ESCs, a base which doubles as a power distribution board, and a board to hold the top of the copter together. It's pretty simple to set up and all you need is two Allen keys to screw everything together.
I suggest labeling each boom with a number and the direction in which its motor is supposed to spin. The below diagram is a good starting point:
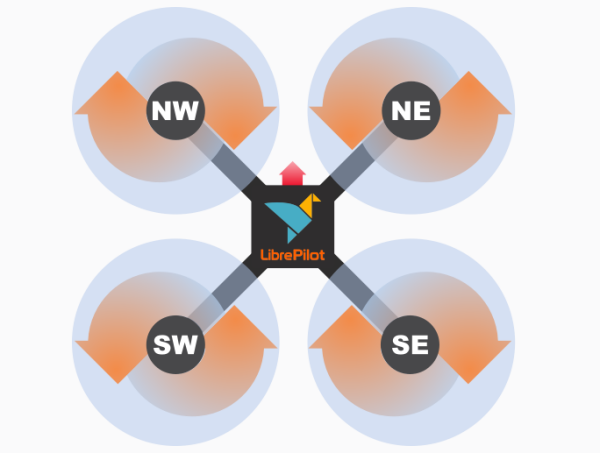
Speaking about labeling, label everything. It only takes a few seconds and it can save many hours of frustration later on. Of note, is the handedness (is there a better term?) of the propeller. Left-handed propellers turn anticlockwise and right-handed propellers turn clockwise. Mounting a propeller the wrong way will cause it to produce thrust in the opposite direction.
Motors
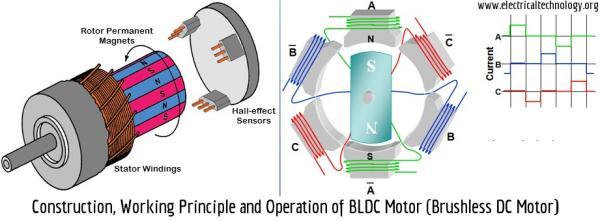
Once you've setup the frame, the next thing you should do is take a look at the motors. These motors are brushlessmotors and they are very different from brushed motors. For starters they have three wires instead of the two on brushed motors. Another peculiarity about these motors is that they are out-runner motors. This means that the case of the motor rotates with the propeller and not the motor shaft alone.
Despite being a lot more power efficient than brushed motors, these motors can generate a great deal of heat when running at full power. I would not recommend testing it at full power on the ground as there won't be any airflow to cool the motor down. This can permenantly damage your motor, and if you're unlucky, your ESC as well.
Anyway, the motors can be screwed directly into the booms of the quadcopter. Most motors come with a few accessories - an adapter for the base to mount it on to differently keyed frames and a propeller shaft with a nose tip. Don't worry if the propeller shaft seems to wobble or come loose. It's designed to only be fully secured when the propellers are mounted on the motor.
The direction of rotation is determined by the ESC, so we don't need to worry about that at the moment.
Electronic Speed Controllers (ESCs)
The ESCs link the flight computer (FC) with the motors. The input to the ESC is PWM fed over the BEC connector. Each ESC have its own 8-bit SoC to send signals to the brushless motor to turn at the desired RPM. In the FC settings, you can adjust the ESC update frequency, which is usually between 50Hz and 490Hz.
A brief digression on the BEC - the thinner wires at the power input side of the ESC. Known as the Battery Eliminator Circuit, it steps down the voltage of the battery to a comfortable 5V for powering components such as the FC or any other devices you may want to connect to the aircraft. The FC only needs power from one BEC and it may even be harmful to connect more than one BEC to the FC. There are some suggestions here on how to take care of this problem.
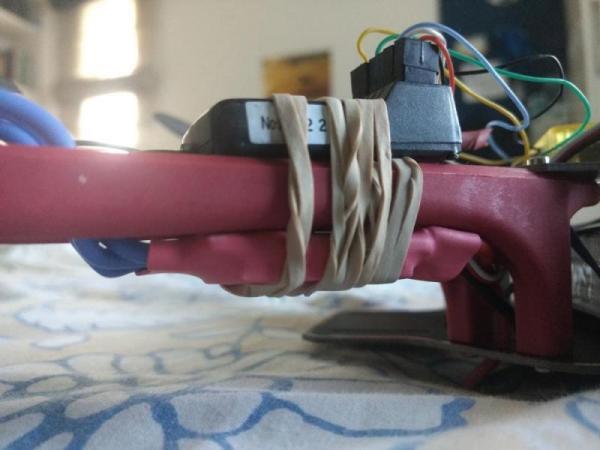
The ESCs regulate the amount of power going to the motor depending on throttle input and can get very hot as well. Mounting the ESCs under the booms will give it sufficient airflow to cool down properly. You want to make sure that the three wires with female bullet connectors is facing the male bullet connectors of the motor. The other side with the male connector and the BEC goes to the power distribution board of the quadcopter.
Mount the ESCs on to the booms with rubber bands, or better, zip-ties.
As with all electronics with large capacitors, ESCs can have spectacular explosions when things go wrong. Short circuits or using the wrong polarity on the power input side of the ESC can cause it to get damaged in a matter of seconds.
On the other hand, things are a lot more flexible on the power output side of the ESC. It is possible to connect the three output connectors in any order to the motor, but a good rule of thumb is to connect the middle wire of the ESC to the ground wire of the motor and to interchange the other two wires to reverse the direction of rotation.
Power Distribution Board
The frame of your quadcopter probably will have a power distribution board of its own with solder points. However, I used a separate power distribution board with the T-type connectors for the ESCs and the battery. It also has ports for the BECs and corresponding signal wires with a single 5V DC output.
This went right under the base of the quadcopter. It's a bit of tight fit to get all the ESC wires under the base. Again, use zip-ties to secure it to the base.
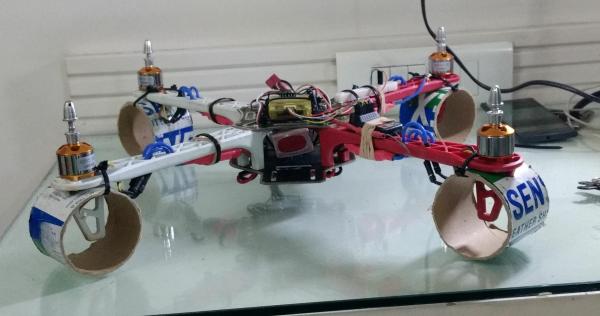
The ground clearance is quite low with the power distribution board attached. You can buy a landing gear or make your own to increase this.
I made a DIY landing gear for my own quadcopter using a badminton shuttlecock tube. It absorbs shocks nicely and gives me just enough ground clearance to mount more components.
Flight Computer and Battery
Now for the good stuff, go ahead and mount the CC3D on the top frame of the quadcopter. Most CC3D's will come with some plastic adapters and a sticky sheet to stick the CC3D on the quadcopter frame. Take note of the arrow on the CC3D and make sure it is facing the direction in which you want your quadcopter to fly forward. Make sure you leave enough room for keeping the mini USB port and the servo header pins accessible!
After binding the transmitter to the receiver, plug it into the receiver port of the CC3D. If you use the FlySky CT6B transmitter/receiver, the receiver probably won't work when directly connected to the CC3D on USB power. If so, you can use an Arduino's 5V and GND to power the receiver for testing it. When flying the quadcopter on Li-Po power, the CC3D will be powered by the ESC BECs which will give it enough headroom to power the receiver.
The receiver can be mounted pretty much anywhere as it is quite small. I mounted the receiver on my quadcopter's boom.
The final step is to add the Li-Po battery to the frame. Some prefer to mount the battery to the base of the quadcopter, but I found mounting the battery right under the top frame (under the CC3D) from E-W was much better for the quadcopter's stability. My guess is that this keeps the vertical CoG of the aircraft closer to the line of application of force, reducing the torque when it makes a maneuver.
Again, the place where you mount your battery is dependent on the size of the battery. Secure the battery with as many zip-ties as you want. There's no such thing as using too many zip-ties to secure components on quadcopters.
Putting It Together
ESC Calibration
Before you start configuring your CC3D, it's a good idea to make sure your sure your ESC and motors are working properly. For this, connect the ESC directly to the battery and the ESC's BEC straight into the 3rd channel (the throttle channel ) of your receiver. Keep the transmitter switched on with zero throttle input. On connecting the battery, you will hear a calibration beep from the motor. Put the throttle to max power and hold till you hear another calibration beep. After bringing the throttle back to zero input, you should now be able to drive the motor by varying the throttle input.
In case the motor spins the wrong way, just swap the red and yellow wires of the motor.
Cable Management
This isn't really cable management, but I couldn't think of a better title for this section 😅
Connect the ESCs' BECs to the CC3D. The order will have to be changed later when setting up the CC3D so don't worry about that for now. I looped the cables through the holes in the top of the frame so they weren't hanging off the side of the quadcopter. The white wire should face upwards.
The receiver is quite straightforward to setup. The first cable has three leads, one for signal and two for power. This will go in the Channel 1 input of the receiver. The rest of the cables have only one signal lead. Just connect this in the order to which it is connected on the the receiver port side of the leads.
The male connectors for the ESC can go right into the power distribution board.
Software Configuration
The CC3D is a nifty micro-controller. It can be flashed with different FC firmwares and can be extended with GPS and Telemetry capabilities. For now, we will work on a much more humble task - flashing it with a FC firmware.
As the CC3D has been around for a while, it has a good amount of community support in terms of open-source FC firmwares. Two popular ones are Cleanflight and LibrePilot, built out of the ashes of the now defunct OpenPilot.
The firmware gives the CC3D brains to control the aircraft and make decisions on the accelerometer and gyroscope readings. It has a sophisticated PID algorithm to do so.
Both firmwares come with cross-platform desktop apps for configuring the FC. Cleanflight uses a shiny Chrome web-app and LibrePilot has a more traditional Qt desktop app. I liked Cleanflight at first, but flashing it on the CC3D is a mess and I couldn't get it to work properly. On the other hand, LibrePilot is a joy to flash on the CC3D. The desktop app even auto-updates the CC3D's firmware if it is out of date. Therefore, being unable to flash Cleanflight, I setup the quadcopter in LibrePilot instead.
LibrePilot has a pretty easy 'Vehicle Setup Wizard' which, if followed correctly, will get your quadcopter to airworthy shape 95% of the time. You would want to keep the props off during the whole procedure, especially during ESC calibration.
Following this, you can mount the propellers by selecting the right adapter from the adapter kit each prop comes with it. Stick it in to the reverse side of the propeller and mount the propeller such that the side with the pitch and diameter printed on it is facing upwards. You can then mount the nose tip which comes with the motor with a thin screwdriver or Allen key. All the thrust of the quadcopter is generated from the propellers, so you'll want to make sure that this is quite tight. This should make the propeller shaft impossible to pull upwards, and if it isn't, you would want to return the motor before you have a catastrophic accident. The last thing you want is a propeller disloding itself from your quadcopter midflight.
Fly!
Or at least try to if you're a beginner :P If you're using LibrePilot, the default setting has stability assist which makes flying easier. For the more experienced (or gung ho) type of pilot, you can change the settings to use Rate/Acro mode to get full manual control of the aircraft.
Another thing worth looking at is tuning the PID values of the FC for better performance. However, LibrePilot's default values are good enough so this isn't necessary.
And that's it for this tutorial. I'll be writing more as I get more experienced with flying my quadcopter.
09 Jun 2017
I had written this article a bit more than a year ago for a college magazine. This topic has been done to death in a Q/A format, so if you're looking for something new about Y2038, you probably won't find it here
Time has always been a finicky thing to deal with. Our perception of time without any stimulus is limited to less than an hour. We would be severely crippled without our abundance of electronic devices synchronized by internet atomic clocks. Unfortunately, these electronic devices on which we're so reliant on are heading towards a time based computer disaster on the same scale as the Y2K bug of this millennium - known as the Y2038 problem.
How do computers measure time and what is the Y2038 bug?
All UNIX derivative systems (including your iPhone or Android smartphone) measure time by counting the number of milliseconds that have elapsed from the 00:00 UTC, 1 January 1970. This day and time is known as the UNIX epoch. While this method of measuring time has served us well for a number of years, it faces a severe limitation - the time_t int variable (an int variable is a part of a program used to hold integral values) in UNIX used to store the number of milliseconds from the epoch is only a 32-bit data type on older 32-bit computers. This means the time_t variable can only store up to 231 - 1 milliseconds before the counter overflows.
Note: 32-bit systems can hold a 64-bit int by splitting it into two words each of length 32-bits. However, the default int size on 32-bit systems is only 32-bits and a 64-bit int has to be coded separately.
So how long is it between before this overflow?
Exactly 231 - 1 milliseconds after 00:00 UTC, 1 January 1970, which is 03:14:07 UTC, 19 January 2038.
So what will happen?
The overflow in the integer value will cause time_t to reset to - (231) milliseconds. This date is 20:45 UTC, December 1901. This is actually a much more serious situation than just your computer showing a funny date. This has disastrous consequences for systems with 32-bit CPUs as BIOS software, file systems, databases, network security certificates and a wide variety embedded hardware will fail to work. With huge critical machinery such as old electrical power stations controlled by a 32-bit computer, an unmitigated catastrophe is unavoidable.
Oh no! Does that mean my laptop and smartphone will stop working as well?
Depends. The 32-bit time_t variable has been deprecated and replaced by a 64-bit time_t variable which will tide us over for the next 2 billion years. 64-bit CPUs are the standard nowadays and most computers running a 64-bit OS on a 64-bit CPU will not face any such consequences from the Y2038 bug as they use the 64-bit length time_t variable. However, smartphones have only recently shifted to a 64-bit process and 32-bit smartphones and computers will be affected if they are not coded for the 64-bit int length. That is of course, only if you are still using it after 23 years from today :P
But how did this even happen? Why couldn't we just use a 64-bit time_t variable in the first place? It's only 4 bytes bigger!
Short answer: Legacy.
Long answer: The UNIX kernel was created in AT&T and Bell labs in the 1970s. There were many competent programmers working on the project such as Dennis Ritchie of C fame. Initially, Bell engineers used a different method for calculating time, but they found that the counter would only work for 2.5 years. As UNIX was planned to be a long project, they changed the time counter to a 4-byte integer. This of course was also limited to a very finite amount of time. However in the 1970s, the consensus was that computers weren't going to stick around for that much longer and a 60-odd year window was "good enough".
Couldn't they just have just used a 64-byte int anyway?
Not really. Computer resources were scarce in the 1970s and 8-bytes of memory to store time_t was more memory than what engineers were willing to give.
Wait a second! Why doesn't time_t use the unsigned int? Surely UNIX wasn't programmed expecting us to go back in time!
The time_t variable uses the signed int to account for dates before the UNIX epoch. Dates before 1 January, 1970 are represented in a negative number of milliseconds which is why an overflow would take the computer's date to 1901.
But this is 2017! Can't we just upgrade the time_t variable to 64-bits?
Yes we can. In all new software and 64-bit operating systems, the time_t variable has been changed to 8-bytes. The problem is that all legacy software compiled with other older compilers may be incompatible for recompiling with a newer compiler for an 8-byte int value. The problem doesn't just stop there. Many embedded systems and microcontrollers (including the popular Arduino ATMega based platform) use 16-bit CPUs which simply cannot support an 8-byte integer in a 2-byte word length. Some hardware applications may use proprietary firmware which won't receive updates.
How can we fix the Y2038 problem?
There isn't any one-solution-fits-all approach for this since it affects several computer architectures, hardware, and software. While it might be easier to just upgrade all old computers with new 64-bit capable ones, there are still many areas where old 32-bit code is still prevalent. Furthermore, the cost of upgrading all the computer hardware is just too exorbitant to be covered.
If we look at the lessons learned from the past, the Y2K bug was rectified because of the media hype pressuring businesses to update their software to accommodate 4-digit years. Although the Y2038 bug is much more critical and harder to understand than the Y2K bug, there is hope that the same pressure will bring change.
But for now, only time will tell.
Credits: xkcd
26 May 2017
I've been gravitating more towards working on electronics projects. It's a nice change from pecking the keyboard all day and it has plenty of interesting challenges of its own. The biggest difference I found is that you just can't take your hardware working correctly for granted. Things break and catch fire all too easily if you're not careful with what you're doing.
My plan is to make a quadcopter from scratch (a rather loose term) and give it some ability to navigate unsupervised. This approach is (aptly?) called Simultaneous Localisation and Mapping, or SLAM. SLAM is by no means a cheap affair, be it in terms of hardware or software complexity. Using SLAM outdoors normally requires some kind of 3D localiser (such as a depth camera or LIDAR), GPS, and a fairly beefy computer to map the environment.
Of course, I'm setting my expectations low, and I will be very happy if I can get something out of this which is 10% as good as a human flying quadcopter by hand.
It all begins with the hardware and I'm going with this parts list:
- 1045 Propellers x4
- REES52 DJI F450 Frame
- REES52 CC3D F1 Flight Computer
- REES52 1000KV A2212 30A Brushless Motor x4
- REES52 SimonK 30A Electronic Speed Controllers
- SunRobotics 2200mAh 3S 35C LiPo Battery
- FlySky FSCT6B Computer Transmitter
The amount of embedded systems tech in these components is astounding. Each motor is driven by an ESC, which is essentially a full-fledged 8-bit SoC. The CC3D Flight Computer is an engineering marvel in it's own right - it comes with a 32-bit/72MHz flashable microcontroller, an MPU6000 gyroscope/accelerometer for the IMU, and has expansion ports for GPS and Telemetry data. Even the battery is remarkable - it's capable of discharging 850W at peak performance.
What I'm interested in, however, is controlling the CC3D in real-time using an Arduino. Typically, the CC3D is connected to a radio receiver which is wirelessly linked to a transmitter remote which is controlled by hand. The reciever is interfaced to the CC3D by outputting a PWM to each of the 6 channels when the transmitter is operated. Each channel is usually dedicated to only one axis of movement. For example, there are four dedicated channels for throttle control, yaw, roll, and pitch.
The idea behind this is that one day, I will have a lightweight computer (anyone willing to donate an NUC?) on the quadcopter doing SLAM in real-time. The computer will send throttle, pitch, yaw, and roll commands to the Arduino. The Arduino in turn will feed the CC3D with control signals to execute the maneouver plan. It all may seem like a Rube Goldberg machine, but it's a lot easier than building my own flight computer to do the same.
To kick things off, I had to find the PWM frequency the receiver uses for controlling the ESC. To do this, I connected a pin from the output channel of the receiver to an ad-hoc Arduino Leonardo oscilloscope. Using the Processing library, we can get a 0-5V reading of the value on the A0 analog input of the Arduino.

Not a bad start! The peaks are a pretty clear sign that it's a PWM with a low duty cycle. Using a ruler and some more code, I found that the peak to peak time is about 20ms, which works out to be a PWM frequency of 50Hz. This is in line with some websites speculating it works similarly to a servo control.
The length of time at the peak gives us the signal we need to send using the Arduino. Using some more analysis of the waveform, it looked like the signal were about 1-2ms long. A bit more research yielded that this is very similar to the waveform used for controlling servos. Fortunately, the Arduino has a Servo library meant just for this purpose. Using the writeMicroseconds() function, I got a pretty similar waveform:

I would go as far to say that this is an even cleaner signal than what the reciever outputs. I needed a 5V->3.3V voltage divider for the output, so I used 3 identical resistors in series to do the job.
Next thing was to get the CC3D to accept the input. For this it requires manual calibration of the transmitter. In Librepilot, the procedure is quite straightforward - you need to shift the sticks through their minimum, maximum, and neutral outputs to calibrate the CC3D for your transmitter. To do this, I mounted a push button on the Arduino which would cycle through 3 states each time it is pressed - 1100uS, 1500uS, and 1900uS. Not very elegant. Then again, if it's stupid but works, it ain't stupid.
I will be building the rest of the quadcopter once the parts arrive. You can find the code for the Arduino part here: https://github.com/shortstheory/quadcopter-experiments/blob/master/tristate.ino
12 Mar 2017
Recently, I've been trying to read more long form literature. It's been an interesting experience to wane myself off of social media and that experience certainly deserves a post of its own soon. Until then, here are some of my thoughts on the books I finished reading this year:
The Checklist Manifesto - Atul Gawande
The title gives away the premise of the book - which is about the art of managing and creating efficient checklists. This may not exactly sound like a jaw-clenching thriller, but Atul Gawande manages to keep the pages turning with interesting anecdotes about maintaining checklists. A surgeon by profession, Gawande lists instances about how his carefully curated surgery checklist saved lives in the operating theater. As an aviation geek, I enjoyed the story of how creating a pre-flight checklist for the Boeing 299 (now known as the Boeing B-17) saved Boeing from the brink of bankruptcy in the fiercely competitive aviation market of the 1940s. There are narratives about the flip side too. For example, verbose checklists with too many steps for the user to follow, may do more harm than having no checklist at all.
For the most part, the book reads as a collection of anecdotes of varying quality. Pointers on creating a good checklist is scattered too thin throughout the book to be useful. That said, my opinion of this book is probably not the best one to go by as I finished the book over a period of months which broke the continuity of the book.
Freakonomics: A Rogue Economist Explores the Hidden Side of Everything - Levitt and Dubner
I've seen this book practically everywhere. I've heard praises sung about it at length from friends. I've even been listening to the Freakonomics radio podcast for quite a while. But, it was only last month I picked up this book. The cover makes bold claims such as "…Explores The Hidden Side of Everything" along with some terms of endearment from Malcolm Gladwell. Coming to the content, the book covers a range of bizarre topics such as 'What do schoolteachers and sumo wrestlers have in common?' and 'Why Do Drug Dealers Still Live with Their Moms?'. Which is great, because the book makes convincing conclusions on these two topics. However, this cannot be said for some of the other chapters such as 'What Makes a Perfect Parent?' and how a child's name is detrimental to their future prospects. I feel the book doesn't spend enough time establishing how a certain cause leads to an effect in these chapters. The authors do include a pretty long list of citations for each fact at the end of the book (nearly as long as the content itself!), so their claims might be substantiated after all.
Russian Roulette - Anthony Horowitz
It took me forever to find this book. I used to be an avid fan of Alex Rider in school, but I lost track of the series in my dry spell of reading in 11th and 12th. Russian Roulette is something of a spin-off book, set somewhere in the middle of Stormbreaker in the Alex Rider timeline. The book is about all about Yassen, a key character in the Alex Rider series. Like most Anthony Horowitz books, it's not a particularly well-written book. Rather, it keeps one engaged with a fast (but somewhat predictable) plot. I liked some of the parts from Yassen's past in Russia, though the rest read like a rehash of Scorpia. Still, I finished this book much faster than I usually take to finish a book of its length.
Bird by Bird - Anne Lamott
In this book, Anne Lammot speaks about the joys and frustrations in the solitary world of a writer. From the outset, I loved this book. Lammot's writing style is hilarious and is loaded with dry wit and sarcasm. As with The Checklist Manifesto, the book follows on tangents with no central plot to speak of. On my first read of Bird by Bird, I couldn't help feeling that this book would read better as a blog than a novel. Though it of a much higher quality than a typical blog, the rant filled content would slide in perfectly for this format.
Lammot also peppers the book with some very quotable passages. I won't spoil it here, but it's a must read for anyone into the publishing industry or writing business.
05 Feb 2017
Now I finally have my very own domain name! The old Blogger site is still available if anyone wants to see it but for all future intents and purposes, this will be the place where new blog posts will be put up. While I could configure all traffic to the Blogger site to redirect to this one, the old site has grown on me so much over the years that I feel that it would be a shame to hide it that way.
I had to migrate from Blogger because it is more than evident that Blogger has been getting less love from Google than it deserves. Take for instance, the Blogger web-based post editor - a shining example of an undeveloped relic of Google's products. Posts never autosaved or had any manual version control and a few misplaced keypresses could cause you to lose all your writing progress. Inserting images is a chore and putting up more complicated parts of text such as code blocks and sub-headings is even worse.
Of course as with most things in software development, there are workarounds for everything. The work-around which I had used for the last few blog posts was to write directly in Markdown and then convert it to HTML with pandoc to copy paste in the Blogger editor. Even so, this is clearly sub-optimal and I was spending more time wrestling with the Blogger editor to make my pages look good than I was spending writing actual content. The Blogger theme which I was using appealled to me as 13 year old (heck, it still appeals to me), but it was growing long in the tooth and only had basic support for responsive design and mobile devices. With all these things in mind, I started looking for a new home for my blog somewhere in the middle of last December on a break from college.
I first looked at WordPress. At first, it seemed like my search for a new blogging platform would stop here. Open-sourced, a great browser editor, a cohesive Android app, direct editing in Markdown, local installation for testing, and support for plugins made WordPress everything Blogger wasn't. I loved the number of themes and customisation WordPress provided. But the love was short lived, and it ended when I started researching hosting options for WordPress. Most solutions required me to rent a web-server on a monthly basis and I had no idea what tier of server to get as my blog had only recently seen a huge surge in pageviews. Not to mention, the cost of maintaining a website with such a setup was by no means cheap. This is when I started asking to my geeky friends about how they maintained their own personal websites.
The talks were very helpful, it made me realise that a dynamic blogging solution such as WordPress was overkill for a humble blog of less than 30 published posts like this one. Having a static site made so much more sense. I could write directly in Markdown, in the text editor of my choice. Not to mention, it made the workflow of writing a blog post just like I wrote code, make, git commit, and git push straight to GitHub Pages. GitHub Pages, by the way, offers completely free hosting for static sites. This means that the only thing I would need to pay for would be the custom domain name, a nominal ₹700 ($10) a year, an amount half of what I would be paying for a month of paid hosting. Plus, it would let me get my hands dirty with a bit of web development, something which I had pushed back for a long time.
I decided to start this - what I knew was going to be painful task at about 11pm on a night I just knew I wouldn't be able to sleep.
The first step was to convert all my Blogger posts to Markdown. There were some tools online but all of them messed up the conversion pretty badly. After some more digging, I ended up using Aaron Swartz's html2text Python library which did a better job than other solutions in generating some useful Markdown. I still needed to edit every generated Markdown file by hand to make it something I would be happy with using on my site. I then had to export all the images I had on my Blogger site. This lead to a few more laborious hours of saving each image on the site by hand (Right Click -> View as Image -> Save As). It did cross my mind to automate everything with a script, but it was going to take more time to automate everything and check if the automation was working than it was to do the grunt work of pulling the images. With all the resources safely on my laptop and backed on my Dropbox, I took the next step of looking at static site generators to convert my lovingly handmade Markdown files to HTML.
GitHub Pages seemed to heavily advocate Jekyll so I went with it first. With some tinkering to get the Ruby dependencies installed and posts adapted for Jekyll with the Front Matter content, I managed to get a pretty presentable blog running on localhost:4000/ at 5am on that day. With a quick push to my github.io site, I decided to call it a night and slept off a sleep-deprived session of hacking.
The next few days I played with some more Jekyll themes and found that there were many things I didn't like about it. For one thing, it was written in Ruby which I have no experience with. Themes didn't look easy to work with and there was no native support for tags (there is a workaround for this, but due to my lack of Ruby-fu, it all looked terribly arcane to me). I then put the blog migration on the back burner for a while to work on projects at my college's Automation & Robotics Club.
A few weeks later, I took a look at the blog project with some new perspective. I started by poking around for alternatives to Jekyll. There was one such alternative which ticked all my boxes - a static site generator called Pelican. As WordPress looked inherently superior to Blogger, Pelican looked inherently superior to Jekyll for what I wanted to do with it. For example, it had built-in support for tags, had a theming engine, supported Markdown and reStructuredText, and had several easy to install plugins. Above all, Pelican is written in Python which made it so much easier for me to mess around with it. There were some more modifications to make to the Markdown files (particularly with the post metadata), but it was so trivial that it didn't pain one bit to modify all the files. Not too long after I settled on Pelican, I found a theme which made my blog look exactly how I wanted it to look. The Pure Single theme also has nifty support for custom sidebar images.
There was some initial trouble with setting a blog subfolder in the site and getting images to work on some auto-generated sites (such as the Tags and Categories pages). It later turned out that it was some problem with localhost/ not finding the paths correctly to the images and the site was totally fine when published to the GitHub Pages site. After only three days of using Pelican, I had something which I was willing to show off. The next step was much more straightforward for a change - registering a domain name. I looked into a few options such as GoDaddy, Hover, and Namecheap. Namecheap had positive reviews (unlike GoDaddy) and was the cheapest of the lot. The site configuration to serve pages from GitHub's servers was not more than a 10 minute procedure, and I finally had the site you are reading this article on right now.
There will be a lot more changes coming up on this blog, some of them aesthetic and some functional. I'm also probably going to change the name of this blog sometime soon, to something which is more reflective of my current sensibilities.