Quadcopters - A Hitchhiker's Guide to the Sky
We have liftoff!

Cue me trying to not get my fingers cut off
The quadcopter has been built! I had some problems during the building process, so this is a guide which will hopefully make things easier for people to start off with making their own quadcopters.
I suggest going through all these websites thoroughly before purchasing a single part for your quadcopter. It’s not an extensive list, so I’ll keep updating it as I find more useful links:
If you live in India, the following sites are good places for shopping for parts:
RCBazaar and RCDhamaka have stores in Bangalore. Robu.in is based in Pune.
Hardware Assembly
For clarity, the components I have used in my build are:
- 1045 Propellers x4
- REES52 DJI F450 Frame
- REES52 CC3D F1 Flight Computer
- REES52 1000KV A2212 30A Brushless Motor x4
- REES52 SimonK 30A Electronic Speed Controllers x4
- APM 4-axis Power Distribution Board Type-B1
- SunRobotics 2200mAh 3S 35C LiPo Battery
- FlySky FSCT6B Computer Transmitter
Most of these parts can be picked straight off Amazon. REES52 has a good bundle for a pair of propellers, 1000 KV motor, and ESC which I would recommend buying to keep costs low.
Frame
The first thing you would want to do is start off with the frame of the quadcopter. If you go for a DJI F450 frame (or one of its hundred clones), you will get a box with four arms (technically called booms) for mounting the motors and ESCs, a base which doubles as a power distribution board, and a board to hold the top of the copter together. It’s pretty simple to set up and all you need is two Allen keys to screw everything together.
I suggest labeling each boom with a number and the direction in which its motor is supposed to spin. The below diagram is a good starting point:
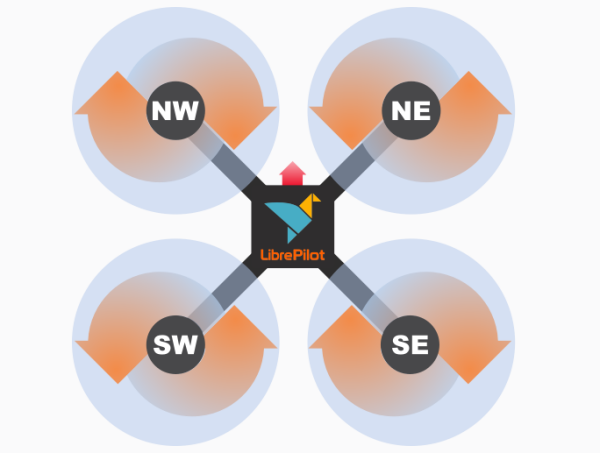
Speaking about labeling, label everything. It only takes a few seconds and it can save many hours of frustration later on. Of note, is the handedness (is there a better term?) of the propeller. Left-handed propellers turn anticlockwise and right-handed propellers turn clockwise. Mounting a propeller the wrong way will cause it to produce thrust in the opposite direction.
Motors
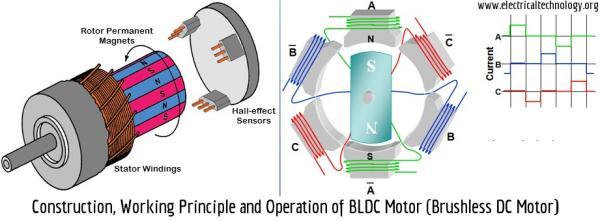
Once you’ve setup the frame, the next thing you should do is take a look at the motors. These motors are brushlessmotors and they are very different from brushed motors. For starters they have three wires instead of the two on brushed motors. Another peculiarity about these motors is that they are out-runner motors. This means that the case of the motor rotates with the propeller and not the motor shaft alone.
Despite being a lot more power efficient than brushed motors, these motors can generate a great deal of heat when running at full power. I would not recommend testing it at full power on the ground as there won’t be any airflow to cool the motor down. This can permenantly damage your motor, and if you’re unlucky, your ESC as well.
Anyway, the motors can be screwed directly into the booms of the quadcopter. Most motors come with a few accessories - an adapter for the base to mount it on to differently keyed frames and a propeller shaft with a nose tip. Don’t worry if the propeller shaft seems to wobble or come loose. It’s designed to only be fully secured when the propellers are mounted on the motor.
The direction of rotation is determined by the ESC, so we don’t need to worry about that at the moment.
Electronic Speed Controllers (ESCs)
The ESCs link the flight computer (FC) with the motors. The input to the ESC is PWM fed over the BEC connector. Each ESC have its own 8-bit SoC to send signals to the brushless motor to turn at the desired RPM. In the FC settings, you can adjust the ESC update frequency, which is usually between 50Hz and 490Hz.
A brief digression on the BEC - the thinner wires at the power input side of the ESC. Known as the Battery Eliminator Circuit, it steps down the voltage of the battery to a comfortable 5V for powering components such as the FC or any other devices you may want to connect to the aircraft. The FC only needs power from one BEC and it may even be harmful to connect more than one BEC to the FC. There are some suggestions here on how to take care of this problem.
The ESCs regulate the amount of power going to the motor depending on throttle input and can get very hot as well. Mounting the ESCs under the booms will give it sufficient airflow to cool down properly. You want to make sure that the three wires with female bullet connectors is facing the male bullet connectors of the motor. The other side with the male connector and the BEC goes to the power distribution board of the quadcopter.
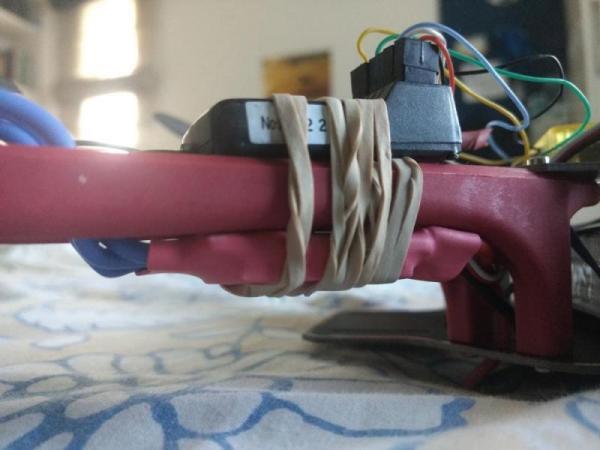
Mount the ESCs on to the booms with rubber bands, or better, zip-ties.
As with all electronics with large capacitors, ESCs can have spectacular explosions when things go wrong. Short circuits or using the wrong polarity on the power input side of the ESC can cause it to get damaged in a matter of seconds.
On the other hand, things are a lot more flexible on the power output side of the ESC. It is possible to connect the three output connectors in any order to the motor, but a good rule of thumb is to connect the middle wire of the ESC to the ground wire of the motor and to interchange the other two wires to reverse the direction of rotation.
Power Distribution Board
The frame of your quadcopter probably will have a power distribution board of its own with solder points. However, I used a separate power distribution board with the T-type connectors for the ESCs and the battery. It also has ports for the BECs and corresponding signal wires with a single 5V DC output.
This went right under the base of the quadcopter. It’s a bit of tight fit to get all the ESC wires under the base. Again, use zip-ties to secure it to the base.
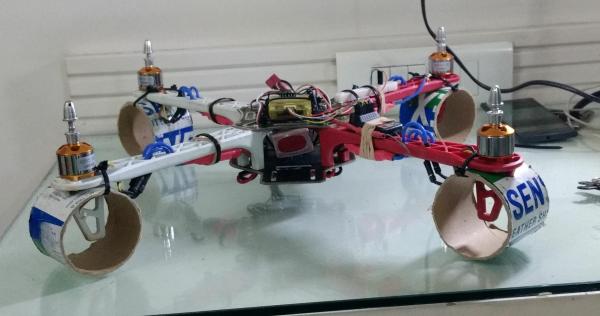
The ground clearance is quite low with the power distribution board attached. You can buy a landing gear or make your own to increase this.
I made a DIY landing gear for my own quadcopter using a badminton shuttlecock tube. It absorbs shocks nicely and gives me just enough ground clearance to mount more components.
Flight Computer and Battery
Now for the good stuff, go ahead and mount the CC3D on the top frame of the quadcopter. Most CC3D’s will come with some plastic adapters and a sticky sheet to stick the CC3D on the quadcopter frame. Take note of the arrow on the CC3D and make sure it is facing the direction in which you want your quadcopter to fly forward. Make sure you leave enough room for keeping the mini USB port and the servo header pins accessible!
After binding the transmitter to the receiver, plug it into the receiver port of the CC3D. If you use the FlySky CT6B transmitter/receiver, the receiver probably won’t work when directly connected to the CC3D on USB power. If so, you can use an Arduino’s 5V and GND to power the receiver for testing it. When flying the quadcopter on Li-Po power, the CC3D will be powered by the ESC BECs which will give it enough headroom to power the receiver.
The receiver can be mounted pretty much anywhere as it is quite small. I mounted the receiver on my quadcopter’s boom.
The final step is to add the Li-Po battery to the frame. Some prefer to mount the battery to the base of the quadcopter, but I found mounting the battery right under the top frame (under the CC3D) from E-W was much better for the quadcopter’s stability. My guess is that this keeps the vertical CoG of the aircraft closer to the line of application of force, reducing the torque when it makes a maneuver.
Again, the place where you mount your battery is dependent on the size of the battery. Secure the battery with as many zip-ties as you want. There’s no such thing as using too many zip-ties to secure components on quadcopters.
Putting It Together
ESC Calibration
Before you start configuring your CC3D, it’s a good idea to make sure your sure your ESC and motors are working properly. For this, connect the ESC directly to the battery and the ESC’s BEC straight into the 3rd channel (the throttle channel ) of your receiver. Keep the transmitter switched on with zero throttle input. On connecting the battery, you will hear a calibration beep from the motor. Put the throttle to max power and hold till you hear another calibration beep. After bringing the throttle back to zero input, you should now be able to drive the motor by varying the throttle input.
In case the motor spins the wrong way, just swap the red and yellow wires of the motor.
Cable Management
This isn’t really cable management, but I couldn’t think of a better title for this section 😅
Connect the ESCs’ BECs to the CC3D. The order will have to be changed later when setting up the CC3D so don’t worry about that for now. I looped the cables through the holes in the top of the frame so they weren’t hanging off the side of the quadcopter. The white wire should face upwards.
The receiver is quite straightforward to setup. The first cable has three leads, one for signal and two for power. This will go in the Channel 1 input of the receiver. The rest of the cables have only one signal lead. Just connect this in the order to which it is connected on the the receiver port side of the leads.
The male connectors for the ESC can go right into the power distribution board.
Software Configuration
The CC3D is a nifty micro-controller. It can be flashed with different FC firmwares and can be extended with GPS and Telemetry capabilities. For now, we will work on a much more humble task - flashing it with a FC firmware.
As the CC3D has been around for a while, it has a good amount of community support in terms of open-source FC firmwares. Two popular ones are Cleanflight and LibrePilot, built out of the ashes of the now defunct OpenPilot.
The firmware gives the CC3D brains to control the aircraft and make decisions on the accelerometer and gyroscope readings. It has a sophisticated PID algorithm to do so.
Both firmwares come with cross-platform desktop apps for configuring the FC. Cleanflight uses a shiny Chrome web-app and LibrePilot has a more traditional Qt desktop app. I liked Cleanflight at first, but flashing it on the CC3D is a mess and I couldn’t get it to work properly. On the other hand, LibrePilot is a joy to flash on the CC3D. The desktop app even auto-updates the CC3D’s firmware if it is out of date. Therefore, being unable to flash Cleanflight, I setup the quadcopter in LibrePilot instead.
LibrePilot has a pretty easy ‘Vehicle Setup Wizard’ which, if followed correctly, will get your quadcopter to airworthy shape 95% of the time. You would want to keep the props off during the whole procedure, especially during ESC calibration.
Following this, you can mount the propellers by selecting the right adapter from the adapter kit each prop comes with it. Stick it in to the reverse side of the propeller and mount the propeller such that the side with the pitch and diameter printed on it is facing upwards. You can then mount the nose tip which comes with the motor with a thin screwdriver or Allen key. All the thrust of the quadcopter is generated from the propellers, so you’ll want to make sure that this is quite tight. This should make the propeller shaft impossible to pull upwards, and if it isn’t, you would want to return the motor before you have a catastrophic accident. The last thing you want is a propeller disloding itself from your quadcopter midflight.
Fly!
Or at least try to if you’re a beginner :P If you’re using LibrePilot, the default setting has stability assist which makes flying easier. For the more experienced (or gung ho) type of pilot, you can change the settings to use Rate/Acro mode to get full manual control of the aircraft.
Another thing worth looking at is tuning the PID values of the FC for better performance. However, LibrePilot’s default values are good enough so this isn’t necessary.
And that’s it for this tutorial. I’ll be writing more as I get more experienced with flying my quadcopter.